
In this article you will learn how to add tracking links to your LinkedIn profile.
Why is this important?
Because getting people to visit your LinkedIn profile is only half the battle. The real action begins after they visit. That’s when they either move on and forget about you, or take action on something you want them to do. For example:
- They may visit your website
- They may read one of your testimonials
- They may book a call to have a chat with you
Unfortunately, most LinkedIn users don’t even know if those actions are happening. So, how can they improve it?
That’s where tracking links come in handy.
Let’s dive in:
Tracking links show how people interact with you on LinkedIn:
When people visit your profile it’s a sign that they’re curious or interested in you. The general process is this:
- They click on your profile
- They quickly scan through it
- They learn what you are about
- They decide if you can help them
By adding tracking links to your profile, you can understand if your profile is compelling visitors to take action. There are 3 main places where you can add those tracking links:
- Link in Bio or Custom Button
- Featured section
- Experience section
Here’s how each one works, step by step:
1. Creating your tracking links:
Before you do anything on LinkedIn you need to create your tracking links. For that, simply login to your LinMetrics account and decide what website you want to drive traffic to. Is it your main website? Or your lead magnet? Or maybe a video you uploaded to YouTube?
Whatever it is, simply copy the URL of the site and drop it in the LinMetrics shortening field (in this case, we're driving traffic to the LinMetrics home page - www.linmetrics.com).
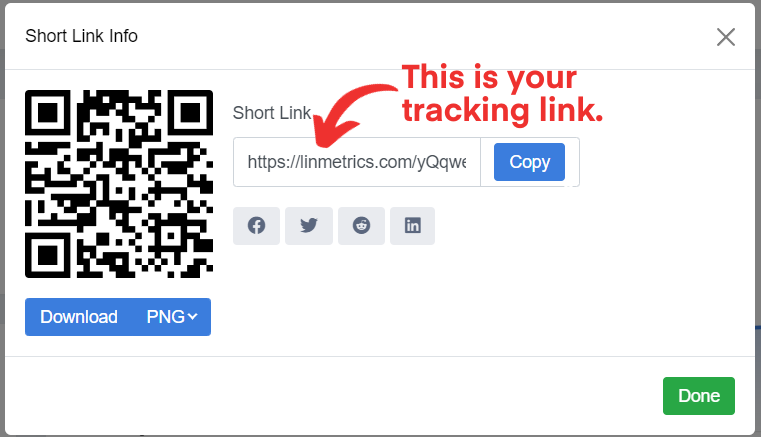
Next, click on 'Shorten' to get your tracking link.
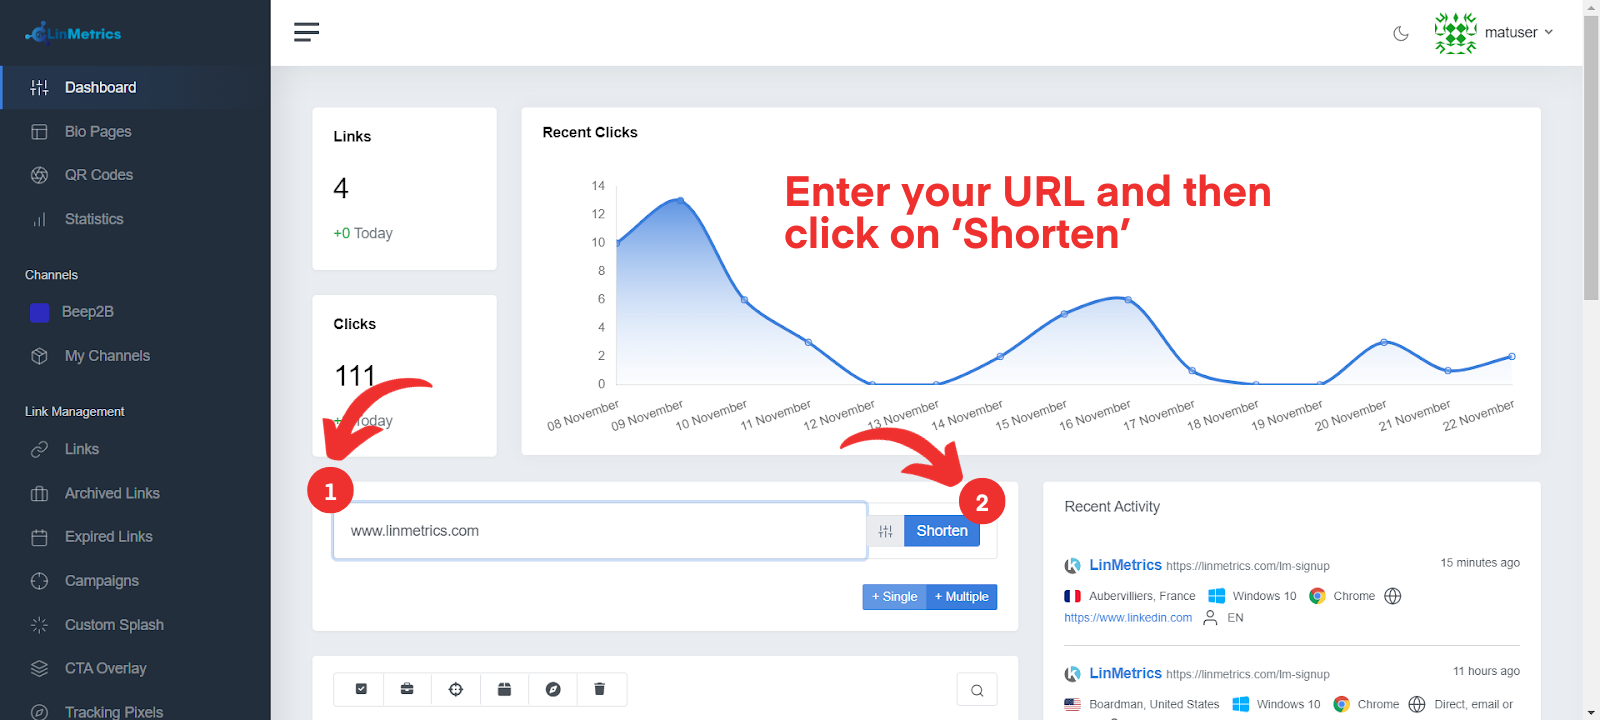
Just like that you've created your first tracking link. Now, any time someone clicks on it, LinMetrics will collect that information and give you different data points.
2. Adding tracking links to your Link in Bio or Custom Button:
The most obvious place to add tracking links is in your Bio. This option is available to all LinkedIn users, but you must have Creator Mode turned on. To turn creator mode on, simply go to your profile, and scroll down to the 'Resources' section:
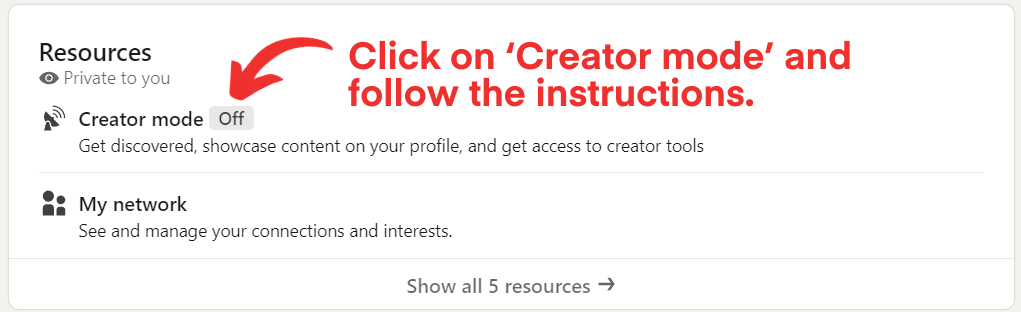
Next, click on 'Creator mode' and follow the instructions in the pop-up window.
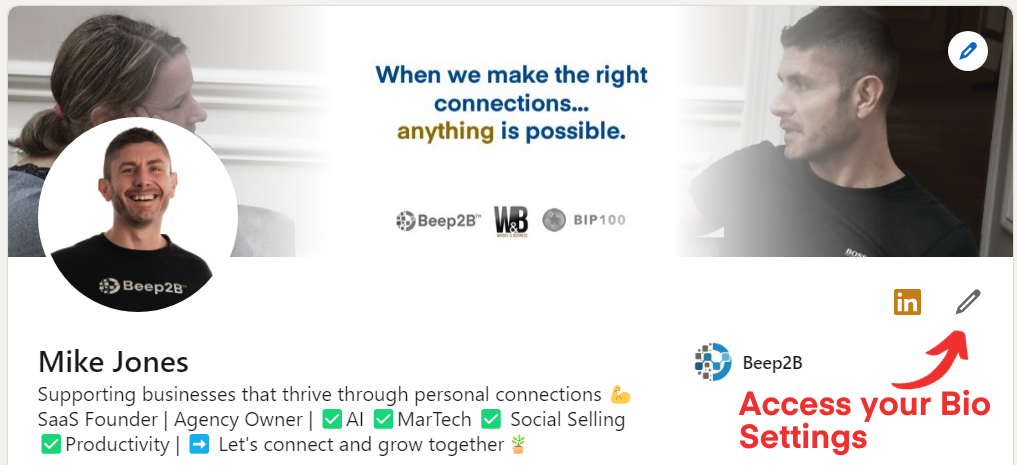
Once you have Creator Mode enabled, you can add your Link in Bio. Right underneath your profile banner, you will see a pen icon. Click on it and scroll all the way down on the pop-up window until you see the 'Custom button' section:
Once you're there, you want to click on 'Edit custom button'.

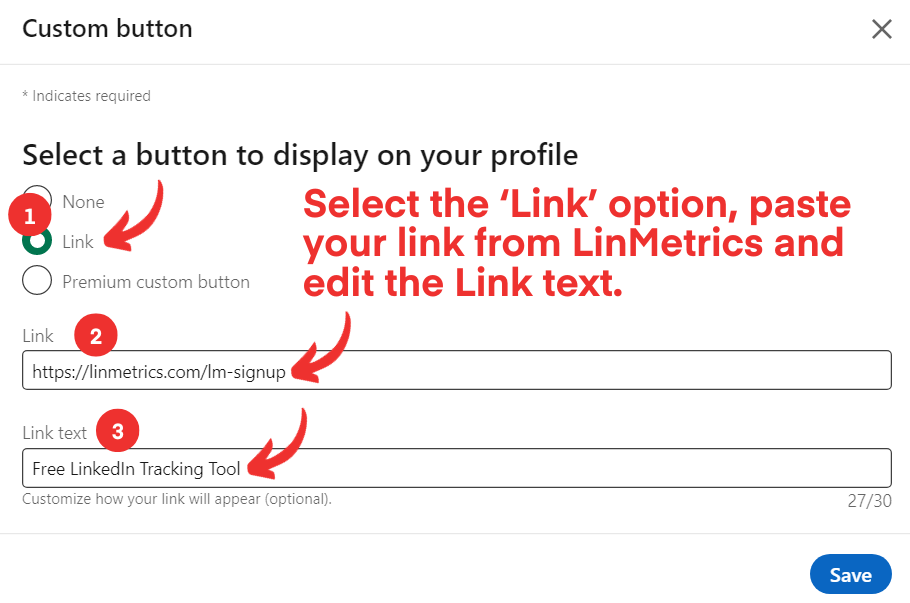
Then, choose the 'Link' option and fill out the 'Link' and 'Link Text' fields. The 'Link' field is where your tracking link goes, and the 'Link Text' field is the text that will be shown on your profile. In other words, the actual link address won't show up on your profile; instead, it will show text that's hyperlinked.
The 'Link Text' field is optional, but you want to use it to your advantage to compel profile visitors to click on it. For example, you could give them access to a free resource like in the screenshot below.
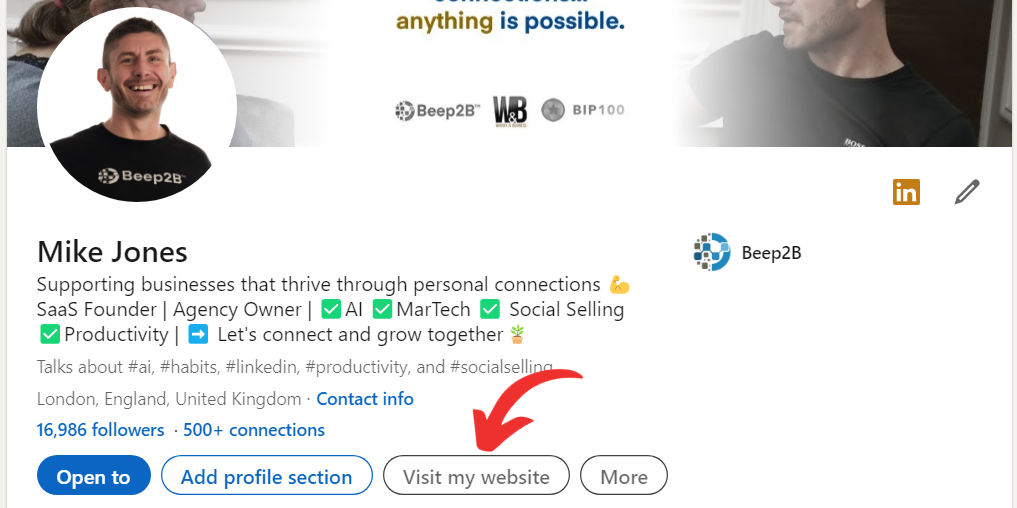
Once you've saved everything it will show right underneath your location. Voilá, you've added the first tracking link to your profile.
Now, when people click on it they'll be redirected to your website and you'll be able to keep track of the traffic with LinMetrics.

Custom Button instead of Link In Bio:
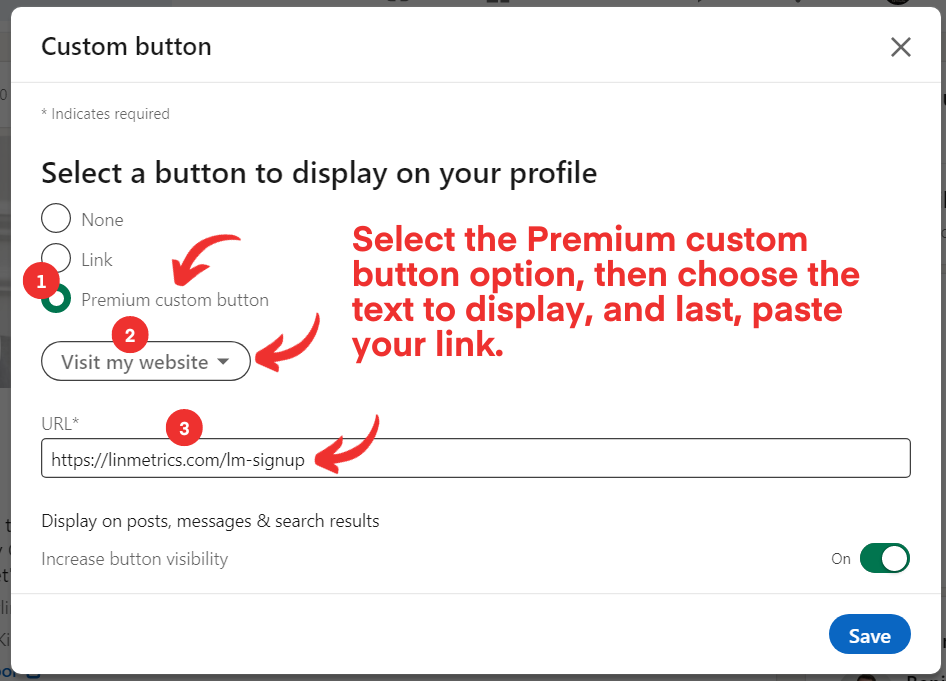
Alternatively, you can also set up your link as a Custom Button. It's a process similar to the Link In Bio setup, but instead, you'll have a button show up on your profile. See below:
To set up a Custom Button, head to the 'Custom Button' pop-up window (the same as in the Link In Bio) and select the 'Custom Button' option. All you need to do is select the text you want to display on the button by choosing an option from the drop-down menu, and of course, paste your tracking link.
There are a few differences between the Link In Bio and Custom Button.
First, the Link In Bio allows you personalize the text displayed on your profile. You can use that to your advantage and do some creative copywriting. Although it's limited to 27 characters, so it's not great either.
Second, the Custom Button can be displayed on your content as well. In our testing so far, this has performed incredibly well, because now anyone seeing your content can visit your website without having to go to your profile first.
So, theoretically, you could drive traffic to your website directly from your content, which is a massive advantage.
The drawback of course is that the Custom Button is not so "custom". You can't modify the text displayed on the button, so you'll only be able to choose one of the options that LinkedIn currently has:
- Visit My Store
- Visit My Website
- View My Portfolio
- View My Blog
- Book An Appointment
3. Adding tracking links to your Featured section:
Right after your banner and profile picture, the Featured section is probably the area that draws the most attention on your profile. That is, if you use it correctly.
You can add different types of content to your Featured section. The options are:
- Posts you've published on LinkedIn
- A LinkedIn Newsletter
- Articles you've written on LinkedIn
- Links to external websites
- Media (photos or videos)
- Or, highlights of your profile
However, tracking links will only work with option No. 4 - Links to external websites. So, we'll show you how to set those up.
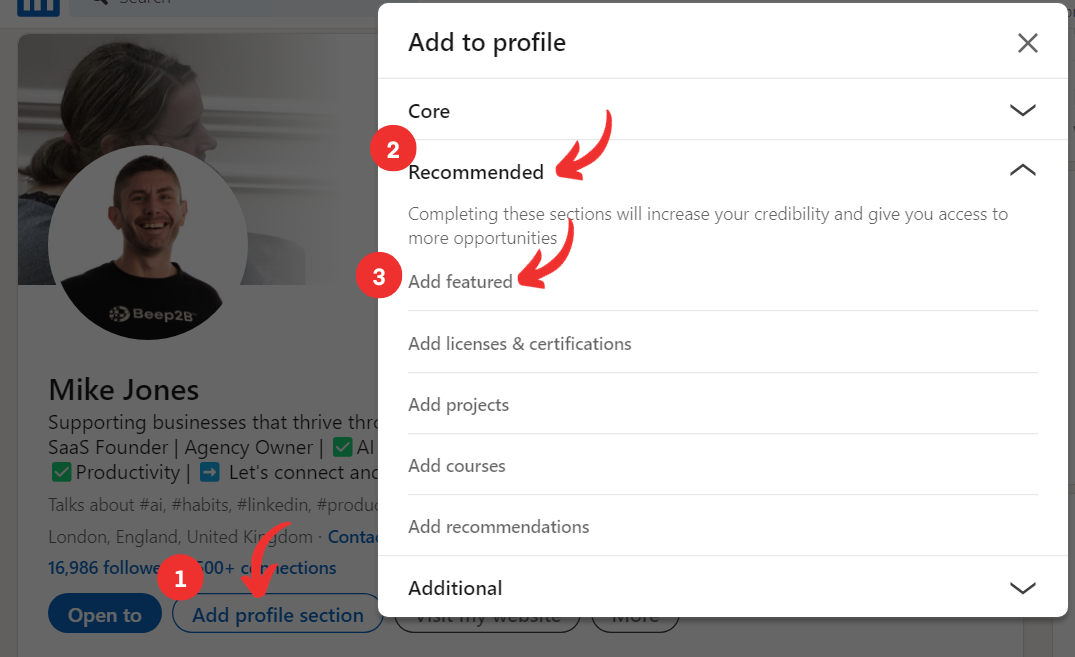
First, you want to make sure that you have the Featured section enabled. If not, click on "Add profile section" underneath you bio and then on "Recommended" and "Add featured".
Once your Featured section is active, click on the pen icon in the top right corner.

There, you will be able to add a new entry. In this case, we want to add a link. So, choose that from the drop-down menu.
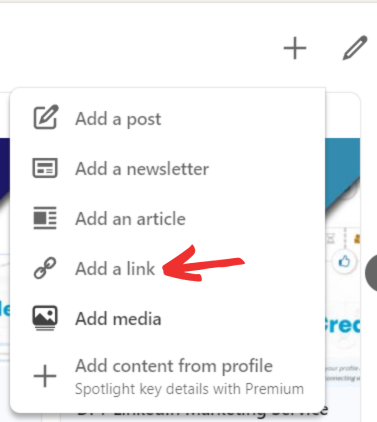
Next, paste your tracking link from LinMetrics into the link field and click on "Add".
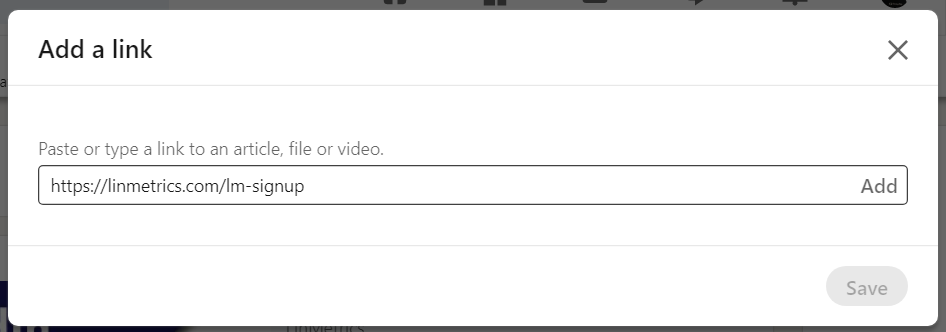
LinkedIn will automatically populate a Title and a Thumbnail for your link based on your website's content. But we recommend that you personalize them to make them as attention-grabbing and compelling as possible.
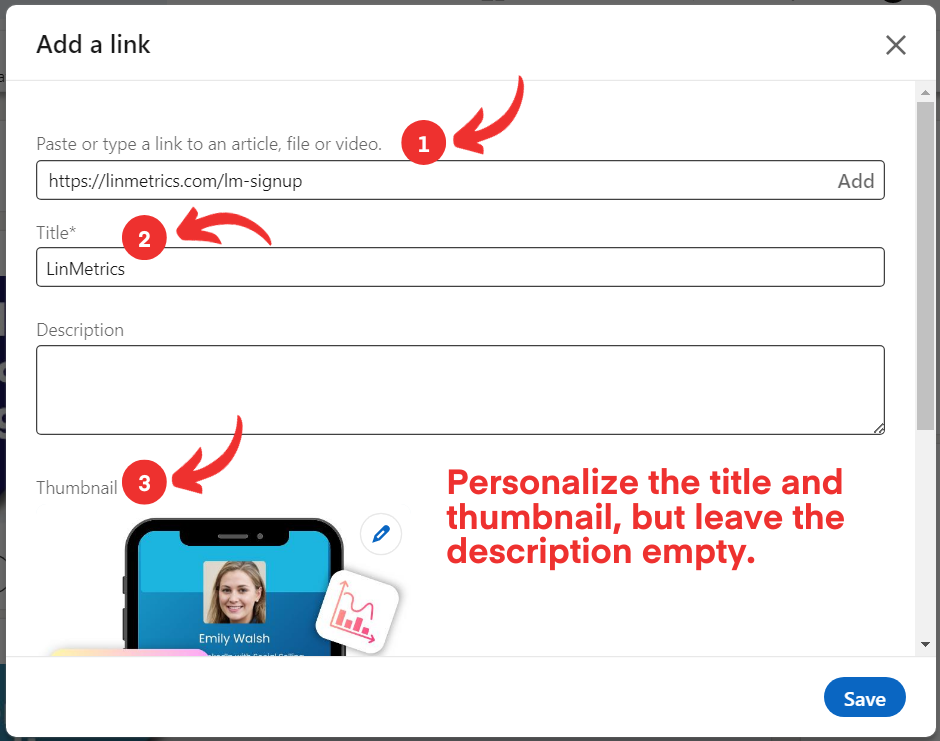
As far as the link Description, we recommend you leave that empty. The reason is that when you add a description to your link, it changes the way your visitors are redirected to your website, and it adds an additional step that causes unnecessary friction.
So, it's better to only have a compelling Thumbnail and Title that invites visitors to click.
Once you're ready, click "Save" and this is how it will show up on your profile:
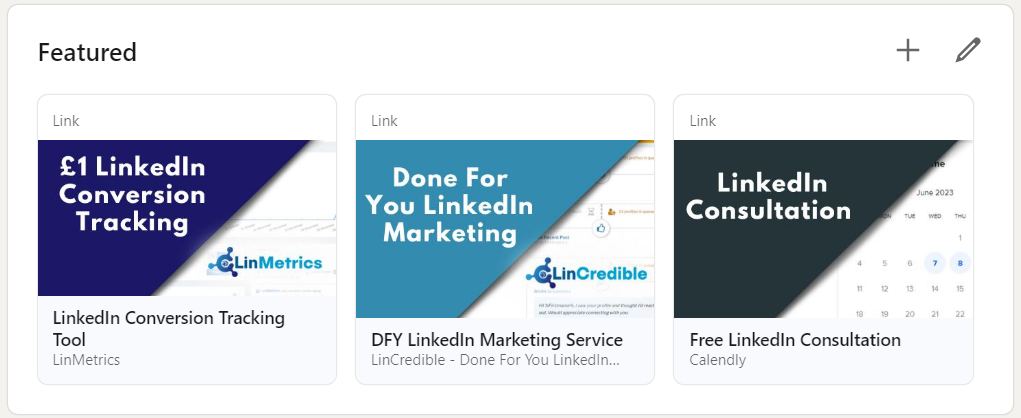
Now, every time someone clicks on any of your Featured section content, they'll be redirected to your website and you'll be able to keep track of it with LinMetrics.
One thing to mention is that you can add as many featured items as you want. But only 3 will display at the same time (like in the screenshot above). If you only add one or two, the dimensions of the thumbnails will also vary, so keep that in mind.
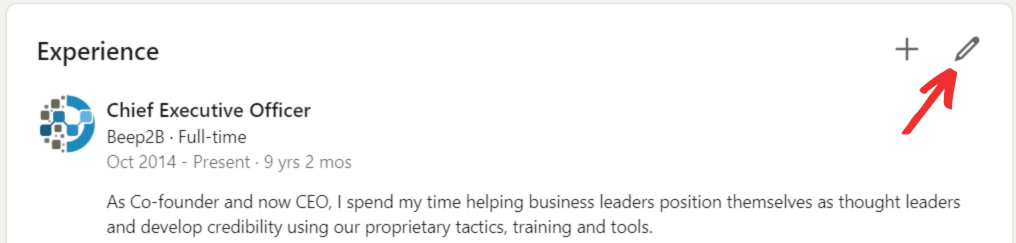
4) Adding tracking links to your Experience section:
Your Experience section is another great place to add tracking links. It's very easy:
First, scroll down to your Experience section and click on the pin icon in the top right corner. Next, do the same on the experience that you want to add the link to. This will open a pop-up window where you want to scroll down all the way to the bottom.
Once you get to the bottom, you will see the ‘Media’ section. There, you want to click on ‘Add media’ and select ‘Add a link’ from the drop-down menu.
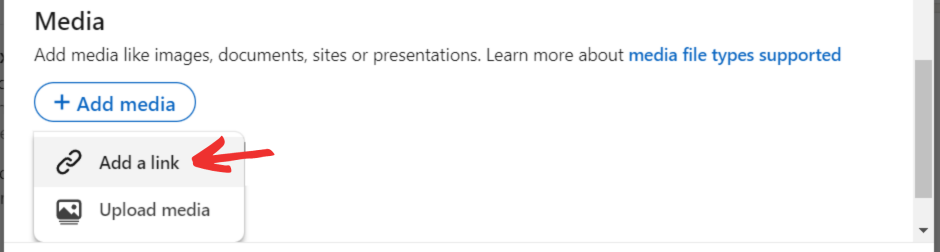
Then, it’s exactly the same process as with your featured section. You add your link, edit the title and thumbnail, and leave the description empty.

Once you’ve made the changes, click on ‘Save’. This is how it will show up on your profile:
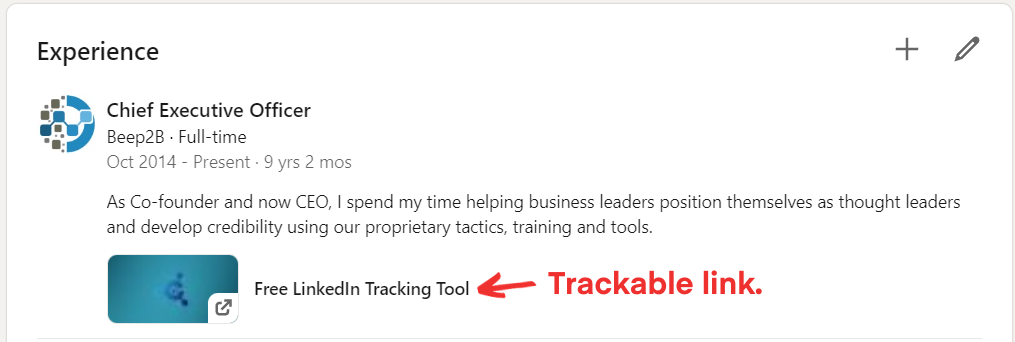
Note that you can add different links to each Experience. And, you can also add multiple links to the same Experience. So, use that to your advantage.
You now know how to set up tracking links on your profile. Now, let’s have a look at where you can see if they’re working.
5) Checking Your Analytics:
Setting up your tracking links is something that you only need to do once (or every time there’s a change in your profile). But, keeping track of the activity from those links is what you’ll need to do on an ongoing basis.
Luckily, with LinMetrics it’s very easy and shouldn’t take you more than 15 minutes a week.
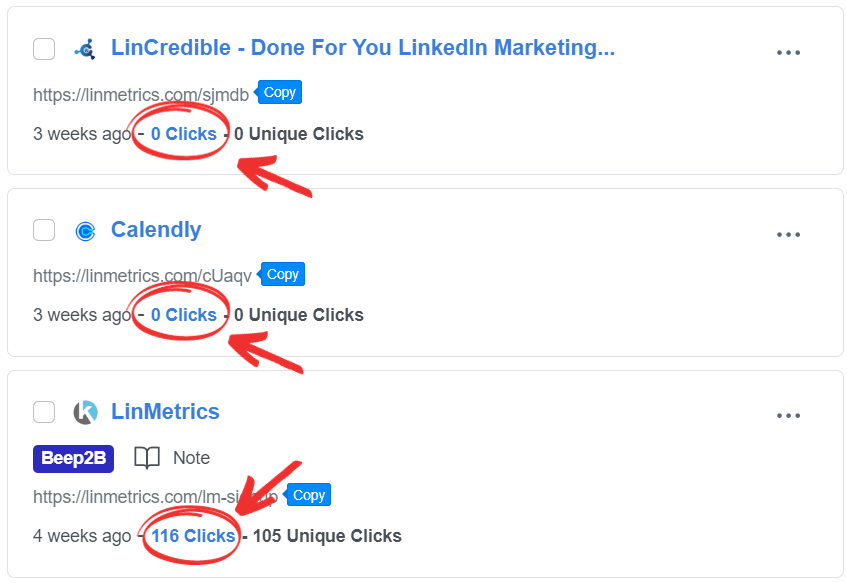
All you have to do is login to your LinMetrics dashboard, click on “Links” on the left-side menu, and look for the links that you’ve set up on your profile.
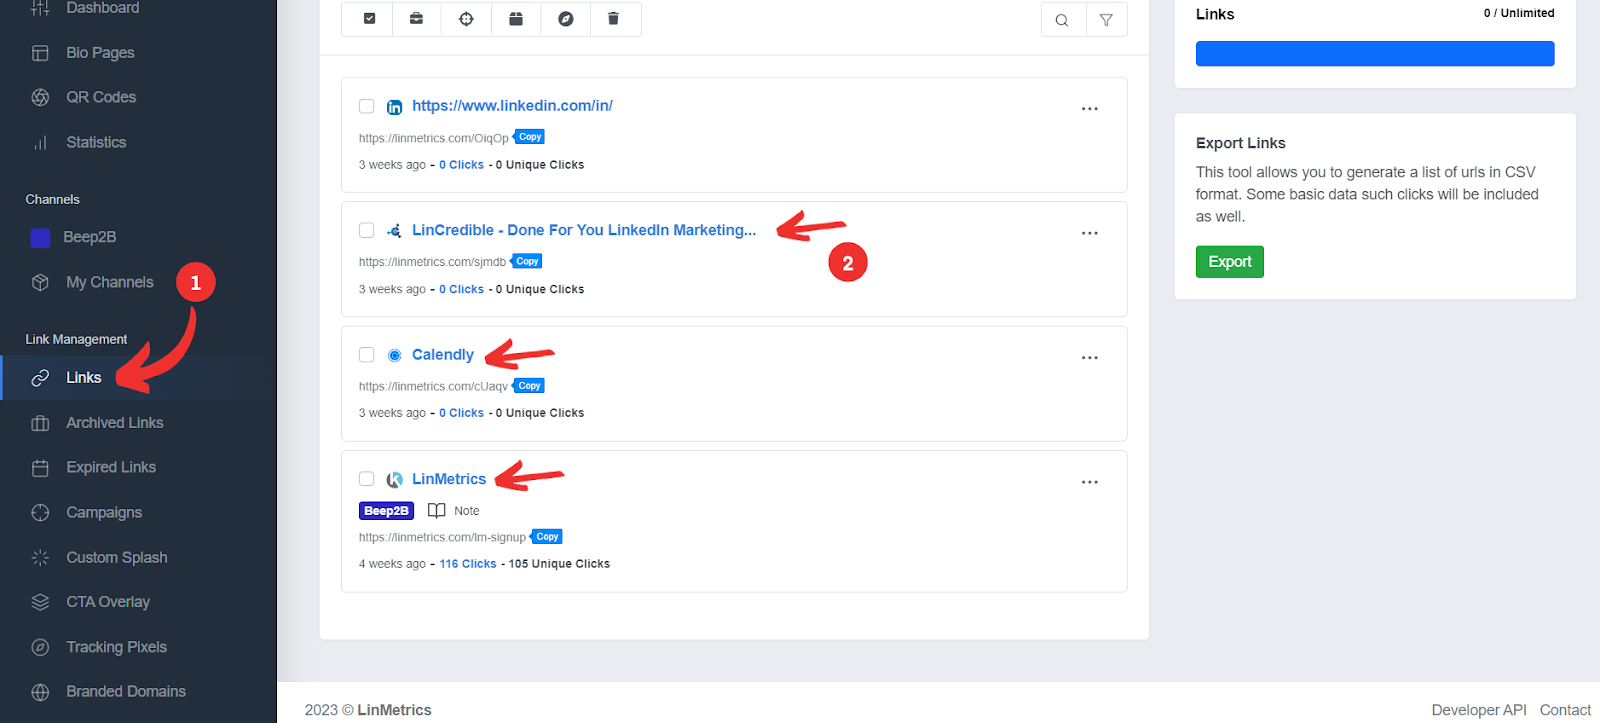
From the screenshot above, I have highlighted the three different links I have set up on my profile:
- One for LinCredible, my LinkedIn Marketing service
- One for my Calendly page
- One for LinMetrics
If you look closer, you’ll notice that LinMetrics shows you how many clicks those links have received since they were set up.
There have been 0 clicks on my LinCredible and Calendly links, which makes sense because I haven’t actively promoted them. But, in the case of LinMetrics, there have been 116 clicks. Which also makes sense because it’s the one I actively promote.
Regardless of the results, now thanks to LinMetrics and the tracking links in my profile, I know what people are interacting with. They are not booking calls or going to my LinCredible website, but they are interested in learning more about LinMetrics.
And that’s the value of setting up those tracking links. Now, I can optimize with real data instead of wondering what is actually happening.
If I wanted to drive more attention towards my Calendly page, for example, I could start mentioning it more frequently in my content, add it to my Custom Button, or remove the other links from my profile so that my Calendly page is the only one.
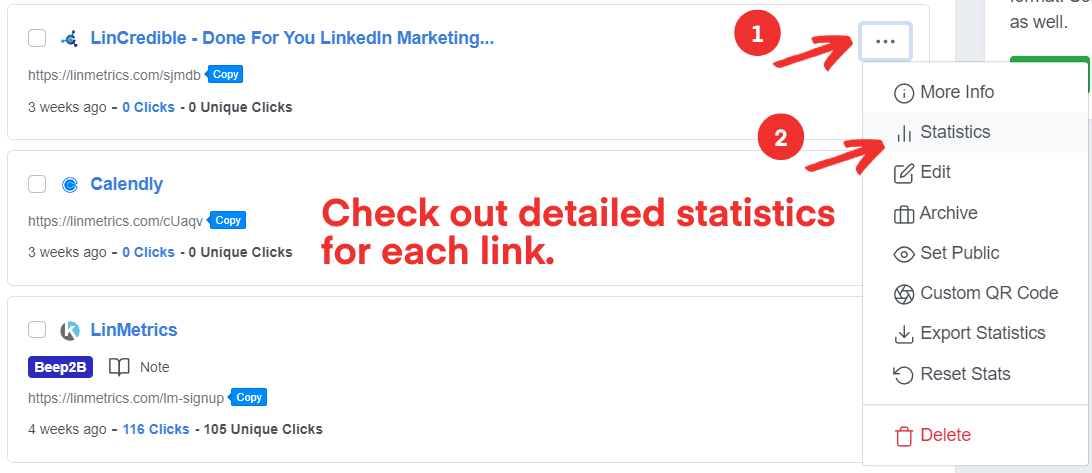
Note that you can also click on the top right corner of all links to get detailed information about each.
Now it’s your turn to implement this on your profile.
You can get started with LinMetrics and get lifetime access for only £1. Click here to set up your account and start tracking the activity on your LinkedIn profile.
.png)
.png)
.png)