.png)
Picture this:
You create a Lead Magnet and post about it on LinkedIn.
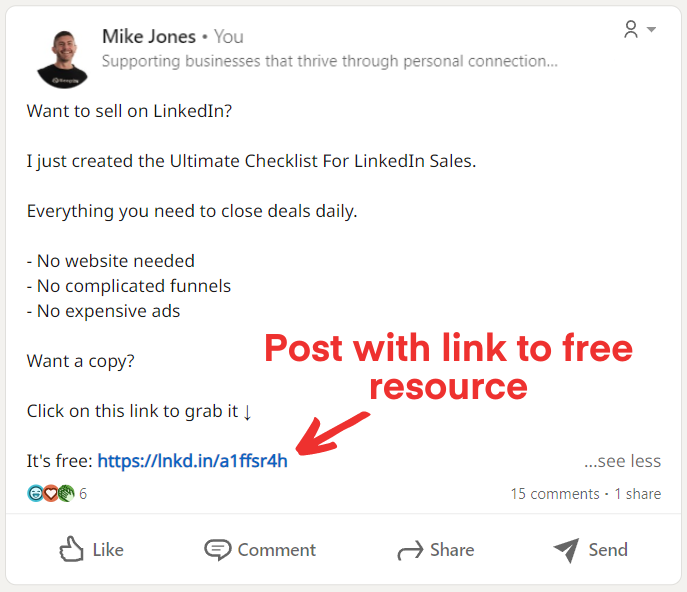
Your audience sees it, and clicks on the link to grab their copy of the free resource.
But before they get access, they are shown a banner ad for just a few seconds where you promote one of your paid products.
That short banner ad is a Custom Splash.
A simple page that pops up before your audience is redirected to the main destination (the lead magnet, in this example).
Why do Custom Splash pages work?
You can think of Custom Splash pages as classic TV ads:
Viewers watch TV because they want to watch their favorite shows. But, before their show starts, they’re shown an ad that compels them to buy something.
Similarly, your audience wants to consume specific resources you create (your Lead Magnets or anything that they find valuable). The Custom Splash page is like the TV ad that gets shown to them before gaining access.
And the goal of the Custom Splash page is to promote anything you like (paid or unpaid). For example, you can use it to promote:
- Digital products
- Webinars
- Online communities
Or anything, really.
In this article, you will learn how to set up Custom Splash pages with LinMetrics in less than 5 minutes.
Let’s get started.
Step 1 - Get your Custom Splash Assets together:
There are a few things you need to have before setting up your Custom Splash. Thankfully, it’s nothing complicated.
What you need is:
- A specific product or “thing” to promote
- A banner to showcase what you’re promoting
- A title and description of what it is you’re promoting
- A photo of yourself or your business logo
And last, but not least:
The link you want to take people to if they act on the Custom Splash page.
Let’s dive into each one:
Specific product or “thing” to promote:
This can be anything, really. As mentioned above, it could be a webinar, an ebook, access to a community, etc. It doesn’t matter what it is, as long as it aligns with your marketing strategy.
One thing to keep in mind is that this will mostly work for low-price or free products. It will be really hard to sell a high-ticket offer on a Custom Splash page. However, you could (if you pull it off, let me know!)
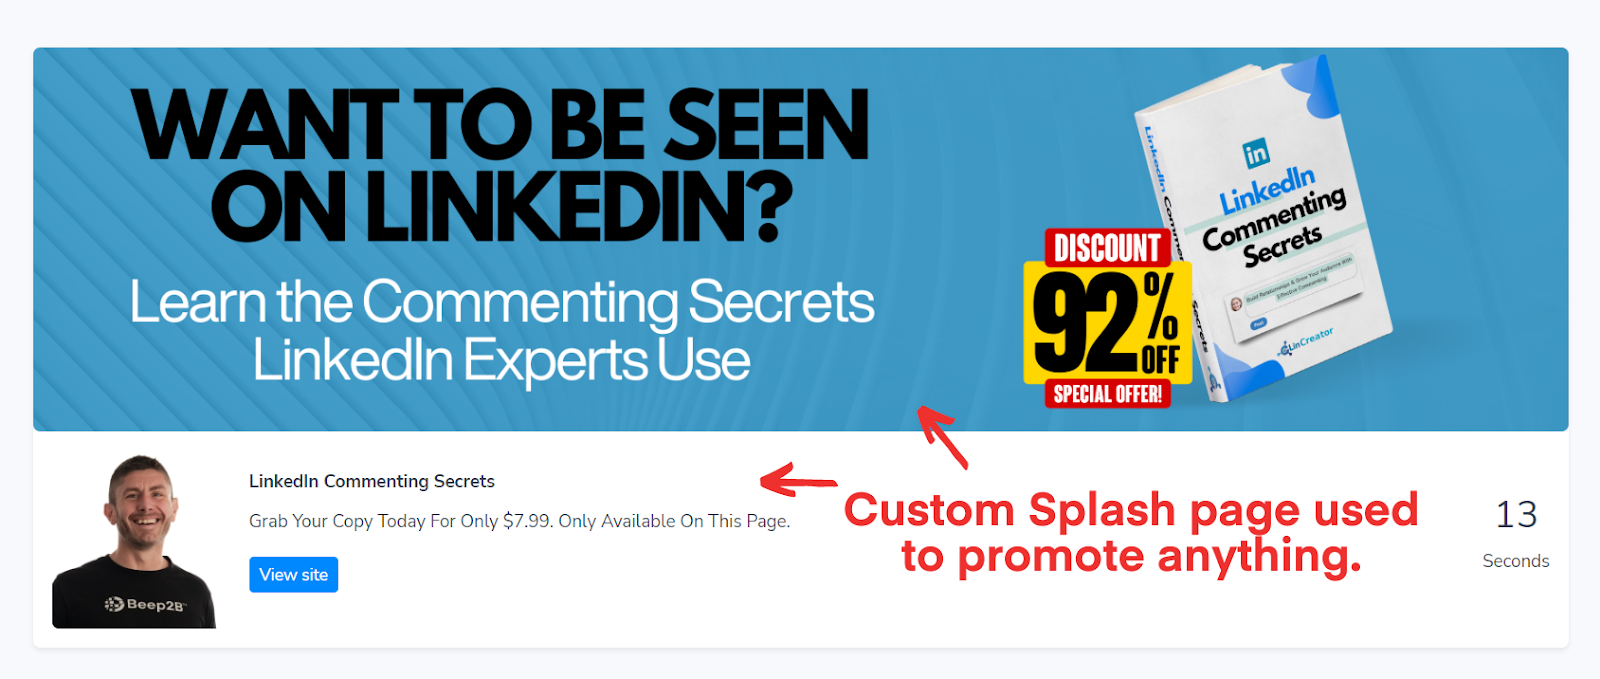
As an example for this article, I’ll create a Custom Splash promoting my paid ebook: LinkedIn Commenting Secrets.
Banner to showcase what you’re promoting:
Think of it like your LinkedIn profile banner, but to promote a specific product. Using the same example from above, this is what it could look like:
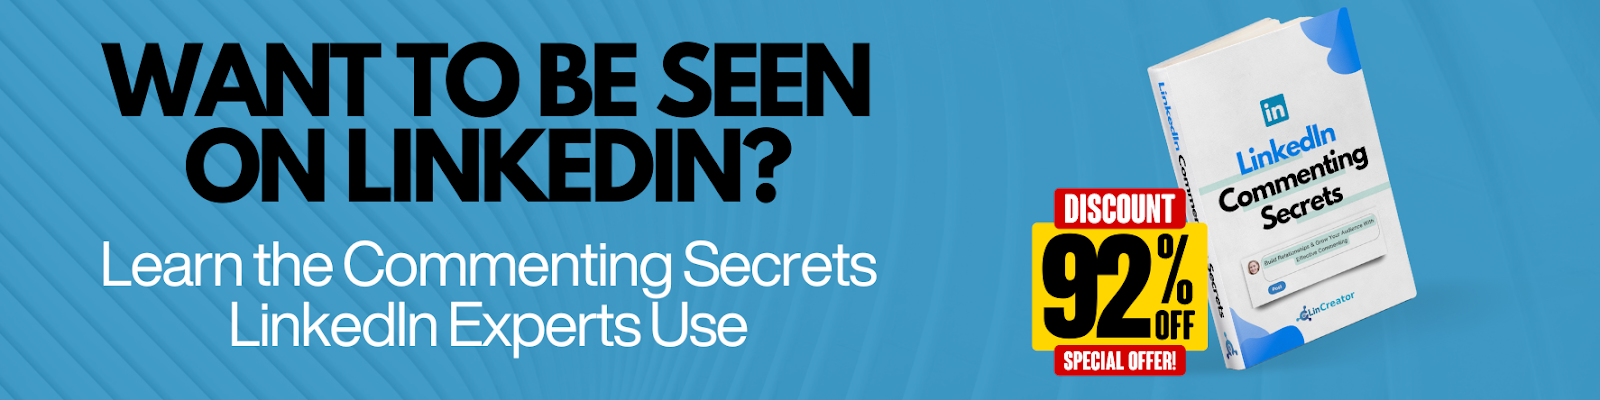
As you can see, the banner is basically the ad creative, just like an image that you would use on a traditional Facebook or LinkedIn ad.
In the case for a Custom Splash page, here are them requirements:
- Minimum width must be 980px
- Height must be between 250 and 500px
- Format must be a PNG or a JPG
- Maximum size is 500KB
Other than that, you can create it in any way you like. I created the one above using the free design tool Canva.
Title and description:
This is really simple. You need a title that goes with what you’re trying to promote, and a description that gives more details.
For the title, you can simply use the name of what you’re promoting. For example, the name of your webinar, or of your online course.
And as for the description, you can add as much text as you want, giving more details about what you’re promoting.
But remember, you’re not really “selling” on the Custom Splash page. You’re only getting people’s interest, so my advice is to not add too much text.
Something that describes your product in a few words together with a call to action is usually enough.
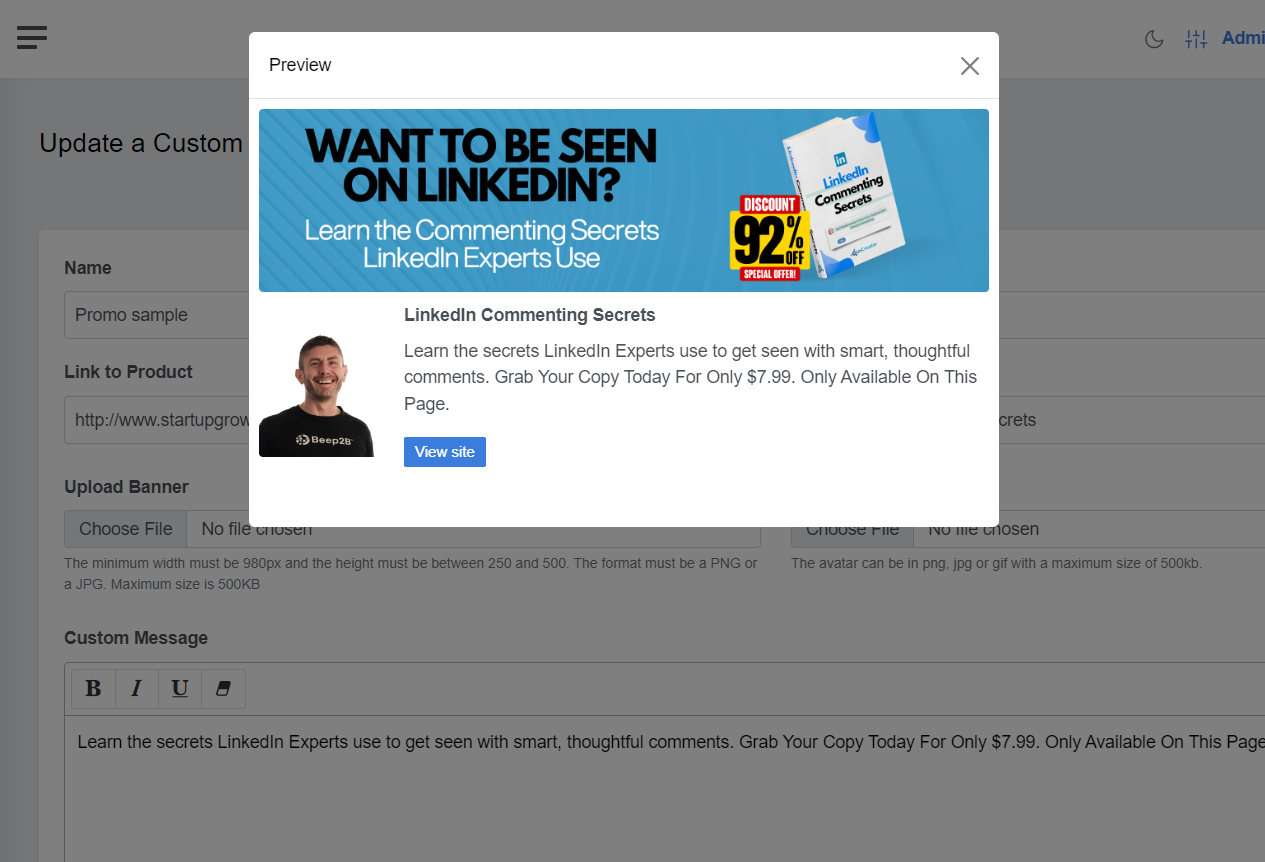
For my example, I went for this:
Title:
LinkedIn Commenting Secrets
Description:
Learn the secrets LinkedIn Experts use to get seen with smart, thoughtful comments. Grab Your Copy Today For Only $7.99. Only Available On This Page.
Photo or logo:
LinMetrics allows you to add your photo or logo to the Custom Splash page.
This is important because it helps maintain trust. If you already have a loyal following on LinkedIn, for example, you want them to recognize you on the Custom Splash page as well.
The photo or logo help with that.
Usually, I add the profile picture from the same platform where I’m promoting this on.
Link:
The most important part of all is the link.
If your audience likes what they see on the Custom Splash page, they will click on the button included on the page and go learn more about the “thing” you’re promoting.
For example, since I’m trying to generate sales for the “LinkedIn Commenting Secrets” ebook, I would take them to the sales page for that book (you can check it out here if you’re curious).
Now that we have everything we need, let’s set it up inside LinMetrics.
Step 2 - Create your Custom Splash inside LinMetrics:
The first thing you want to do is log in to your LinMetrics account.
Once inside, head over to the left-side menu and look for the option called “Custom Splash”.
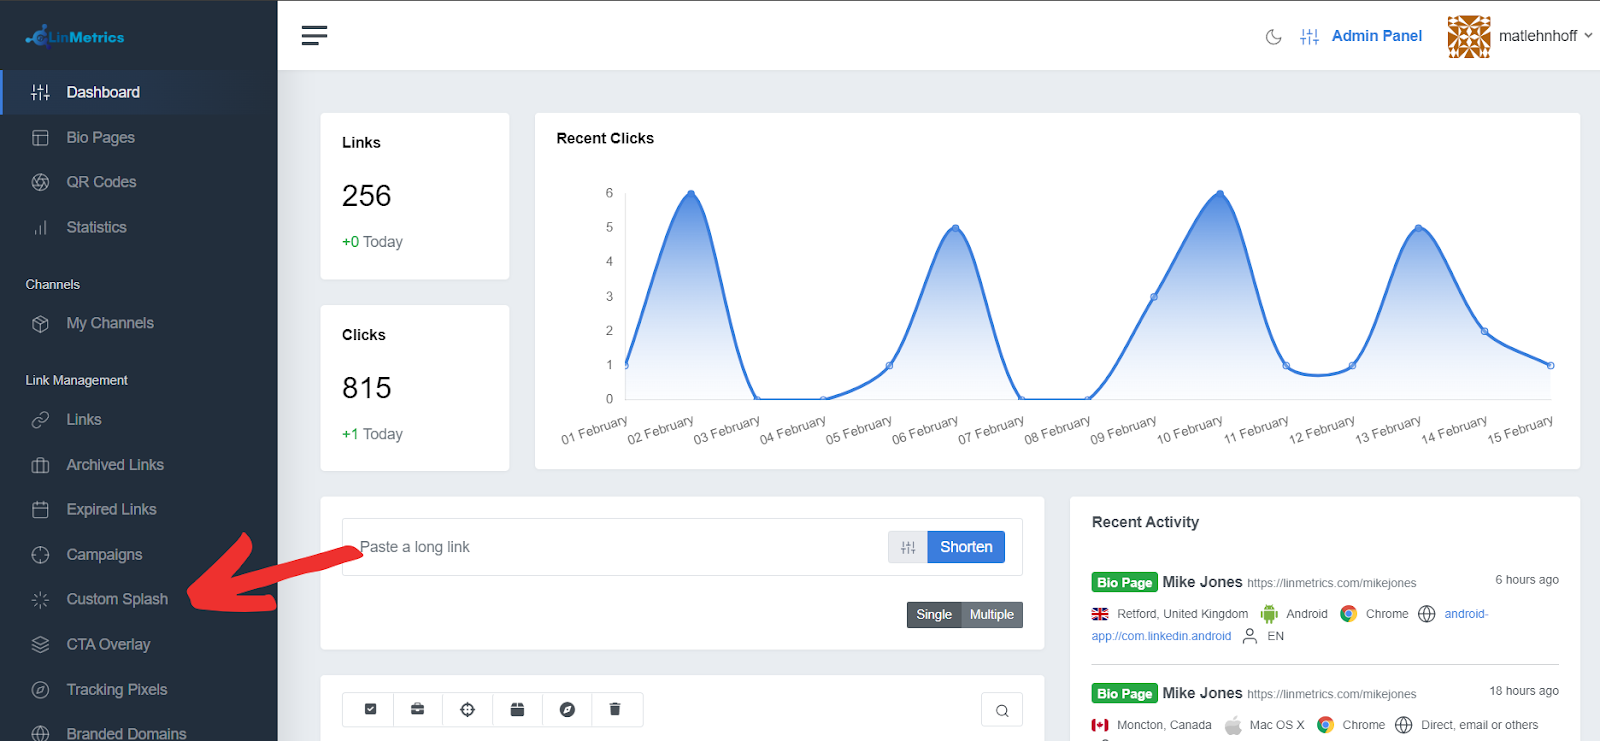
Once there, you’ll see a blue button on the top-right corner that says “Create”. Click on it and it will open up the Custom Splash settings.
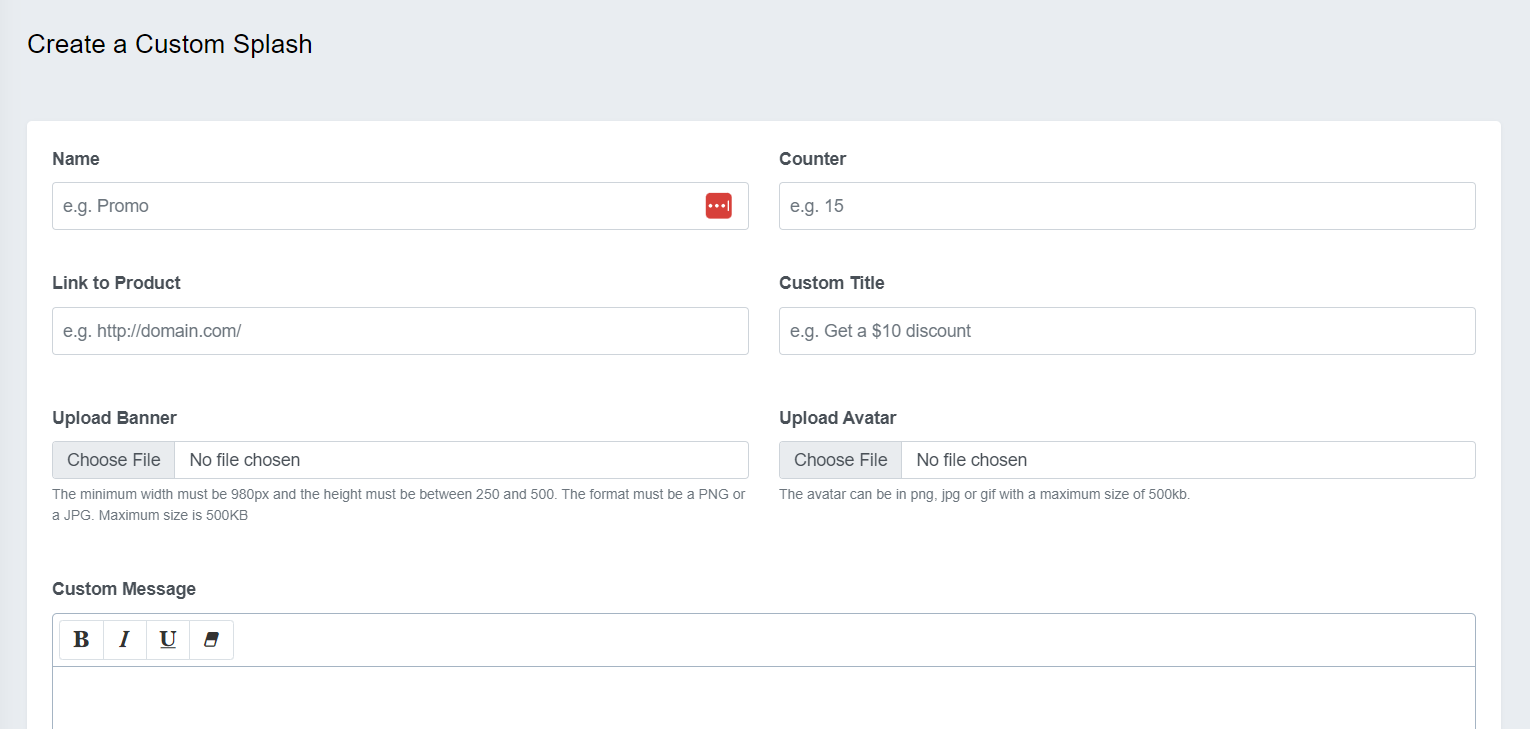
This is the page where we need to enter all the Custom Splash Assets we created in Step 1, plus a few additional settings. Let’s have a look:
Name: This is for your reference only. It’s a name for your Custom Splash, so you can easily remember what it’s about. And yes, you can set up multiple Custom Splash Pages with your LinMetrics account.
Counter: A LinMetrics Custom Splash page works with a counter. In other words, after X number of seconds go by, your visitors will automatically be directed to the end destination.
To clarify the counter even further, this is how it works: A visitor clicks on the link on your LinkedIn post where you mention your Lead Magnet, for example. They’ll land on the Custom Splash page and a counter will start. Once it hits zero they’ll be automatically directed to Lead Magnet that you announced on your LinkedIn post.
In the settings, the counter field asks for a number of seconds to wait. If you enter “15”, it will wait 15 seconds until it directs visitors.
Link to Product: this is the link to the “thing” you’re promoting with the Custom Splash page. Using my example, it’s the “LinkedIn Commenting Secrets” ebook.
Custom Title: this is the title we defined in Step 1.
Upload Banner: here’s where you’ll need to upload the banner created in step 1.
Upload Avatar: this is where you can upload your profile picture or company logo.
Custom Message: Here’s where you’ll enter the description of the “thing” being promoted with the Custom Splash page.
Once you have filled out all fields, simply click on the blue ‘Create’ button that’s at the bottom of this page.
Step 3 - Preview and edit your Custom Splash:
Before actually using your Custom Splash, you want to make sure that everything looks like you want it.
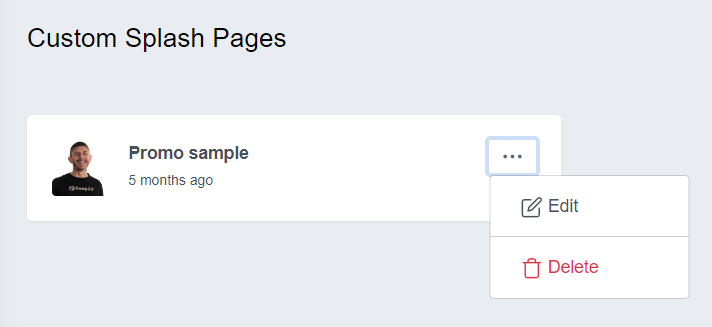
To do so, simply click on the 3 dots button on the Custom Splash that you want to review, and select ‘Edit’.
Next, click on the green ‘Preview’ button that’s at the top-right corner of the page. It will show you the preview of what it looks like.
Now, how do you actually use your new Custom Splash with your short links?
For that, we need Step No. 4.
Step 4 - Using your Custom Splash:
This step is very simple. Your Custom Splash needs to be connected to a link. That way, whenever you include that link anywhere online, it will take visitors to the Custom Splash.
There are two ways of setting this up:
- With new links, or
- With existing links
Let’s take a look at each:
Setting up your Custom Splash with a new link:
Let’s say the URL to my Lead Magnet is www.mikesleadmagnet.com
To connect it to my Custom Splash page, all I need to do is login to my LinMetrics account and paste it into the shortening field that’s on the main dashboard.
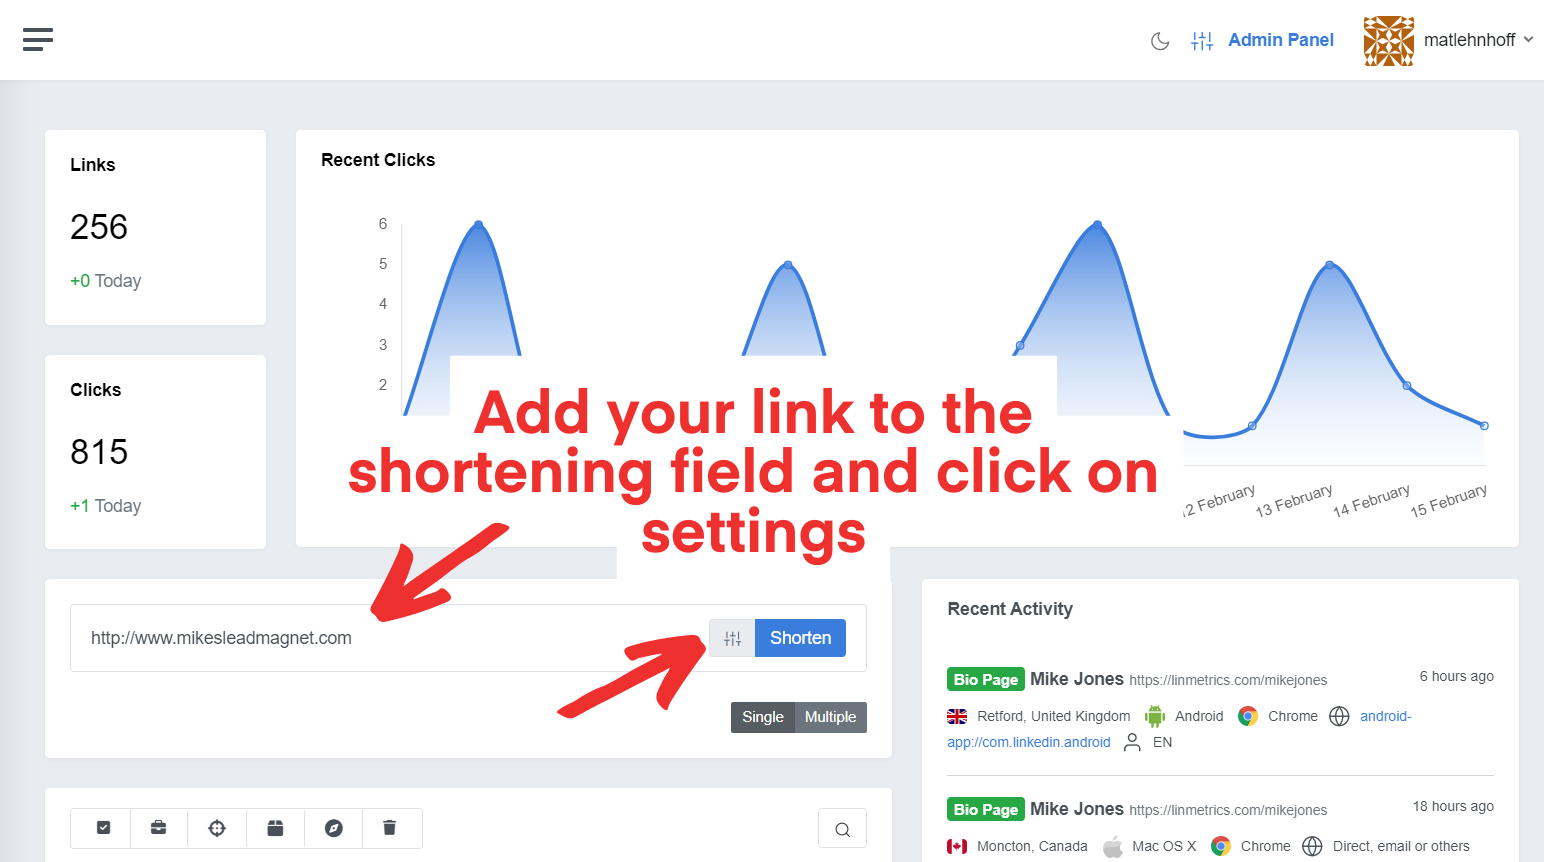
Before shortening, you want to click on the ‘Settings’ button to show more options.
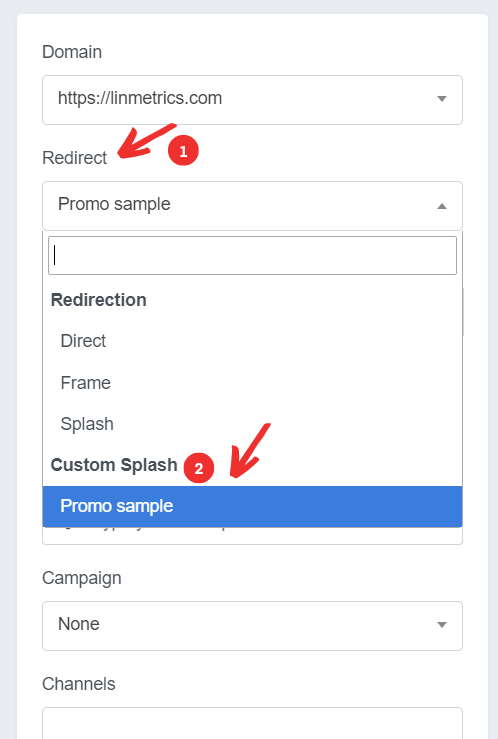
There, look for the ‘Redirect’ option, and click on it. It will open up a menu, where the last option is ‘Custom Splash’. All you have to do is select the right Custom Splash based on the name that you saved it with.
In this case, I saved mine with the name “Promo sample”.
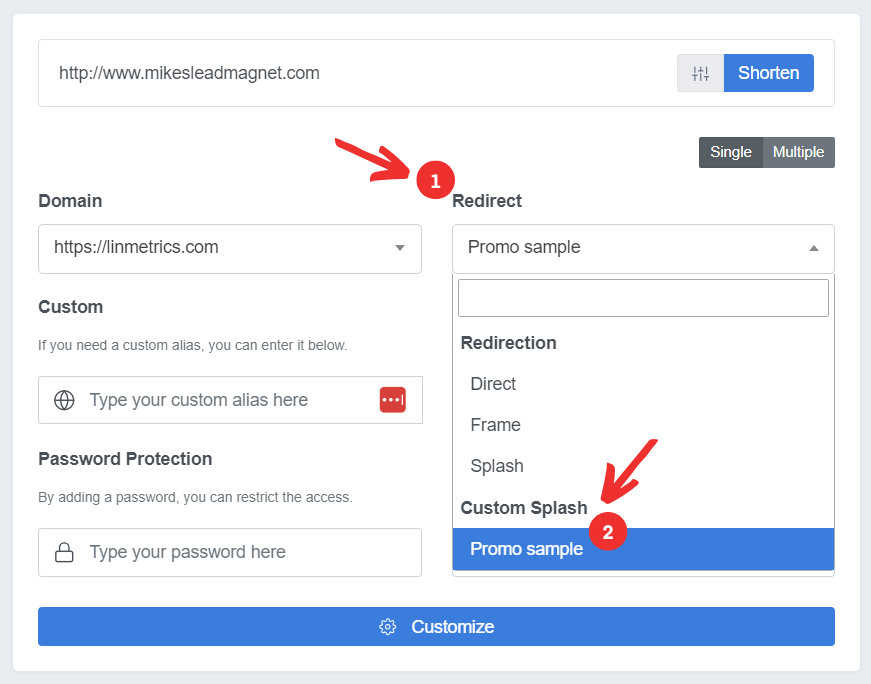
Once that’s selected, click on ‘Shorten’ and your link with the Custom Splash will be created.
Setting up your Custom Splash with an existing link:
Chances are, you already have a link that you want to use for your Custom Splash.
If that’s the case, here’s how you set it up.
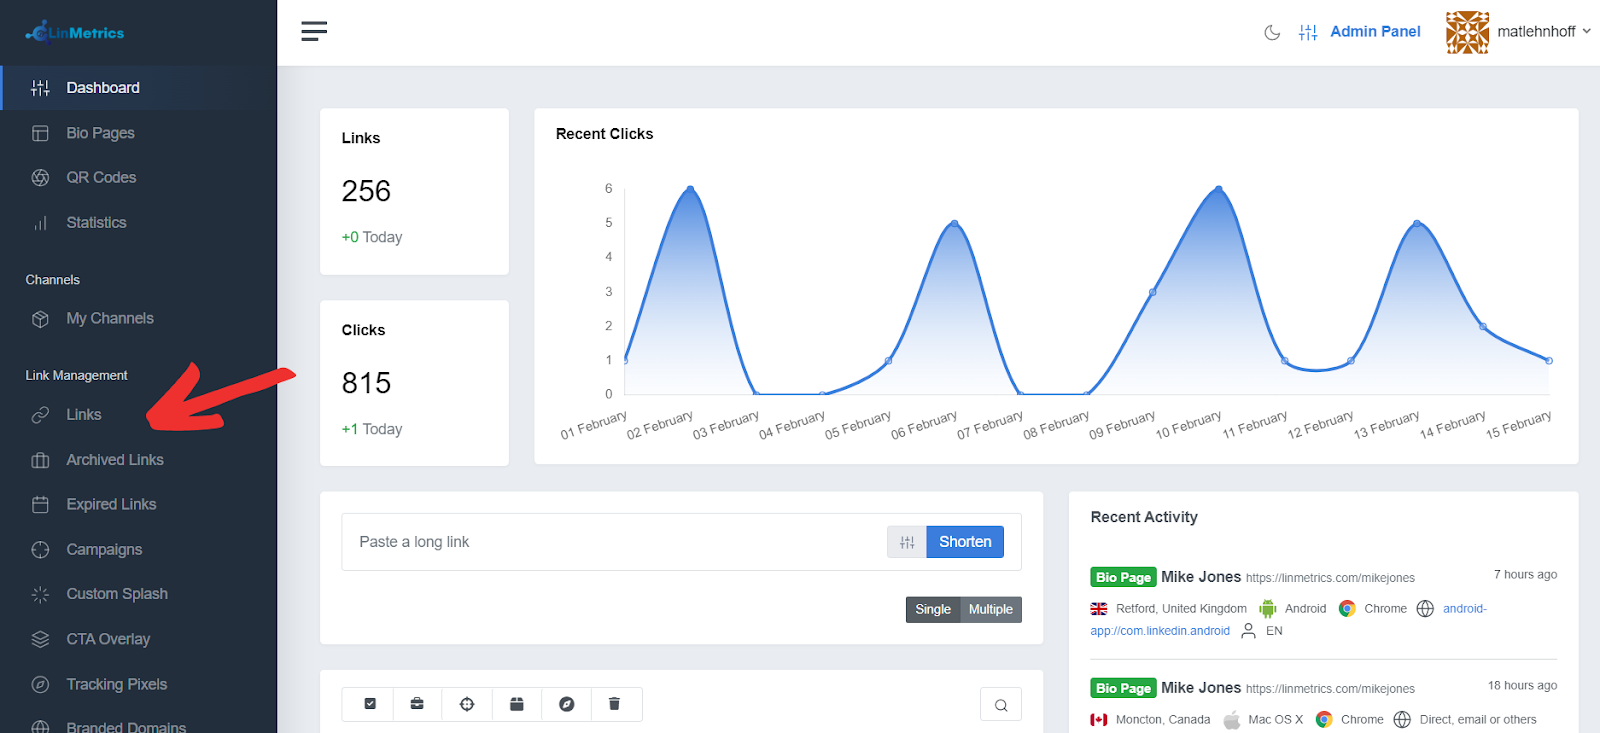
First, look for the ‘Links’ option on the left-side menu on your LinMetrics account. Click on it and find the link you’d like to use.
Next, click on the three dots button on the right side of the link, and then on ‘Edit’.
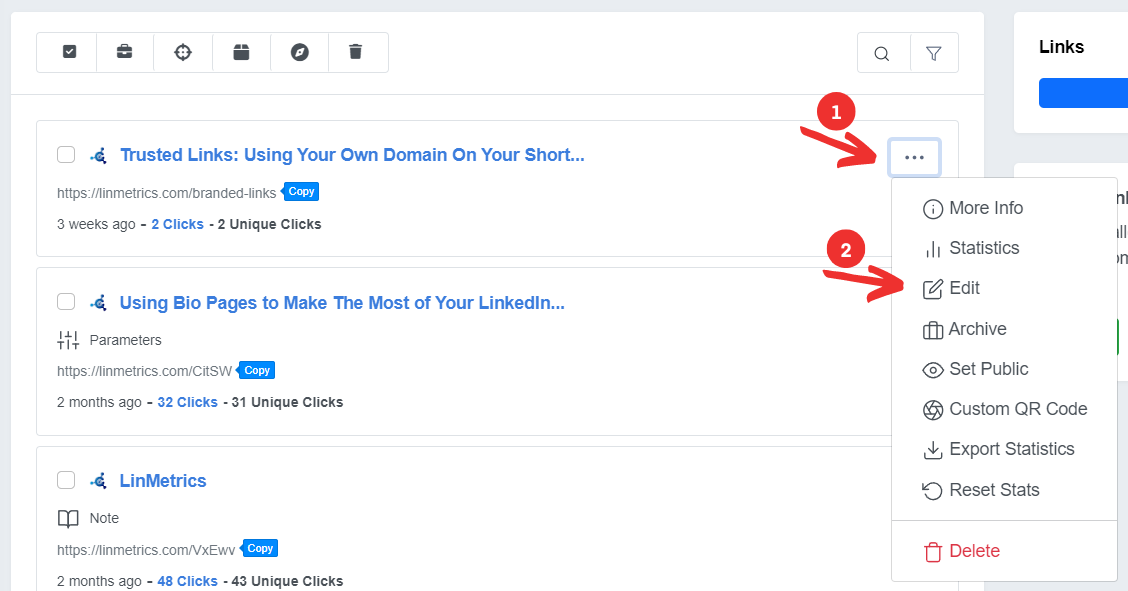
Then, go to the settings on the right side and look for ‘Redirect’ (second option from top down).
Find the relevant Custom Splash and select it.
And last, before you go, scroll all the way down and click on ‘Update Link’. Your link will now be using the Custom Splash you set up.
Final thoughts:
A Custom Splash can help you promote anything online.
If you’re already driving traffic from social media, your website, or any other online platform, consider adding a Custom Splash to your marketing strategy.
With LinMetrics they’re easy to set up, never expire, and can be fully customized. Plus, you get unlimited Custom Splash pages; so you can have as many promotions as you like.
Try it out with your account today.
And if you yet haven’t signed up for LinMetrics, join here.
.png)
.png)